Digital Signature
A digital signature is a mathematical scheme for verifying the authenticity of digital documents.
The goal of this feature is allow app builders to build customized application with digital signature.
Key Concepts
Let's start takeing a look about the principal signature entities.
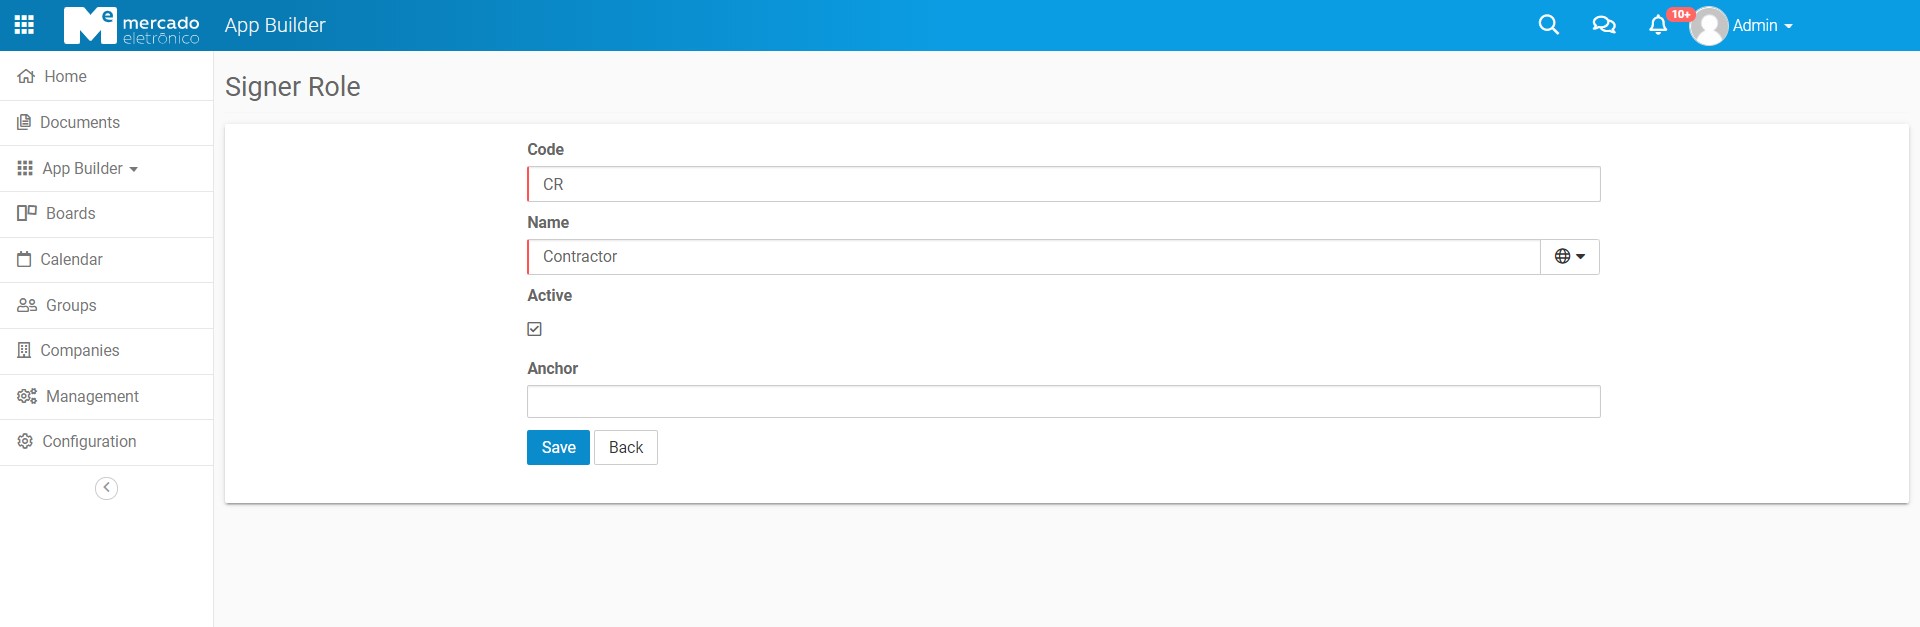
Signer Role
Role is a important concept of a signature. Usually a role is used to define signer type in a document.
In the app builder's digital signature the roles are created in the SignerRole data object. A SignerRole is composed of the following fields:
| Fields | Description |
|---|---|
| code | Text used as anchor to sign the document |
| name | Text to identify the role |
| active | True or false |
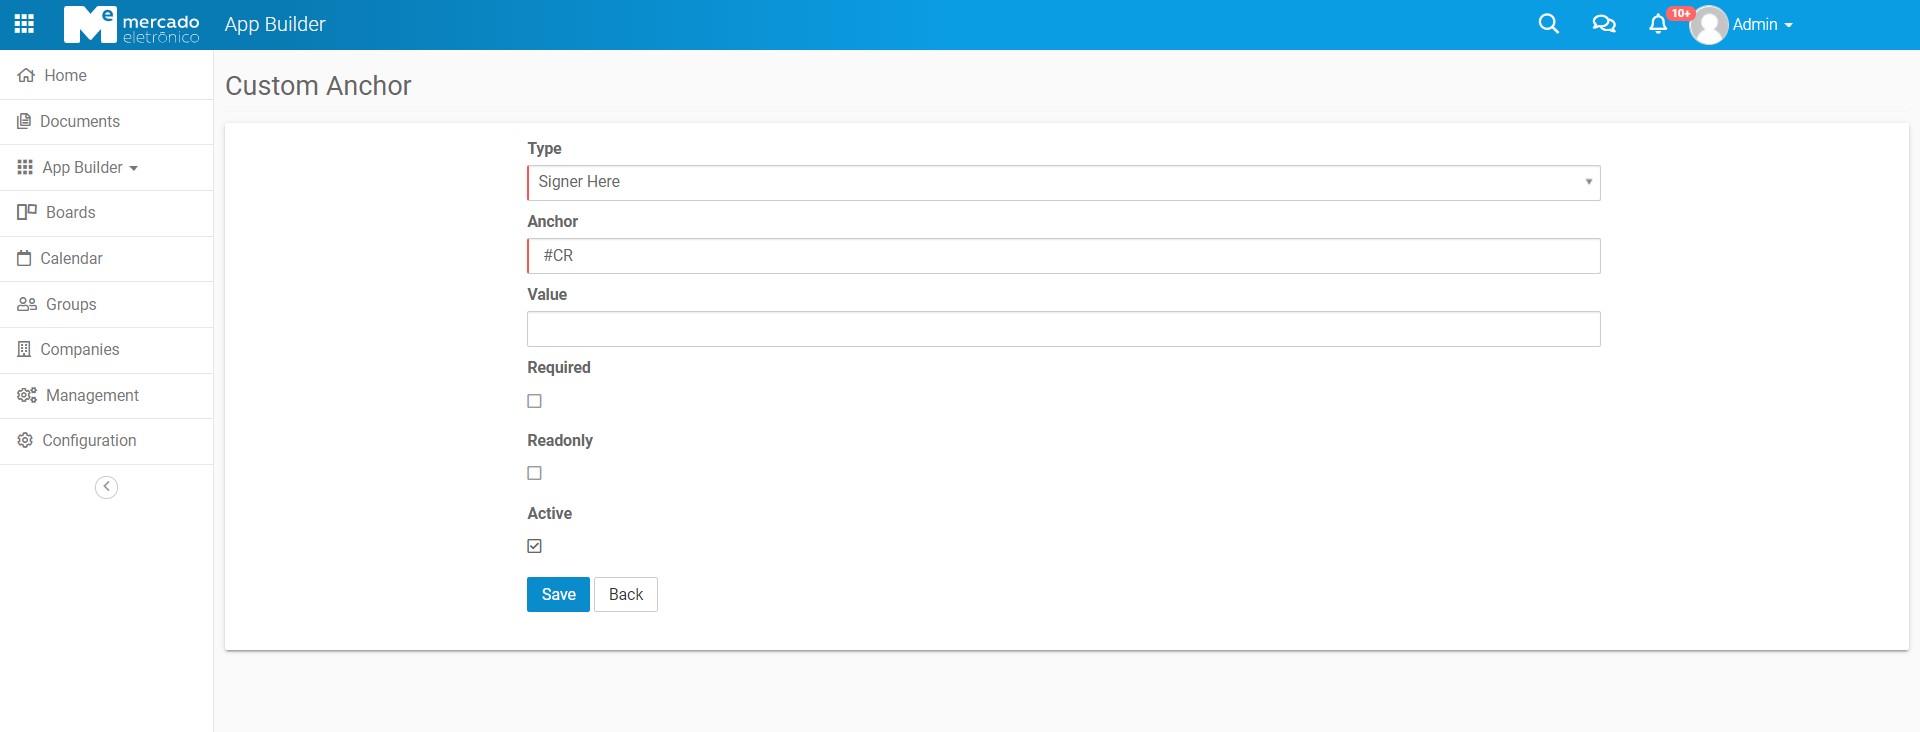
Custom Anchor
Anchors are used to parameterize values in the signing document. They replace the document tags by values according to the anchor type.
In the app builder's digital signature the anchors are created in the CustomAnchor data object. A CustomAnchor is composed of the following fields:
| Fields | Description |
|---|---|
| type | Type used to decide the value to be placed in the tag |
| anchor | Text used to match the document tag |
| value | Optional text used to replace the corresponding tag |
| required | True or false |
| readonly | True or false |
| active | True or false |
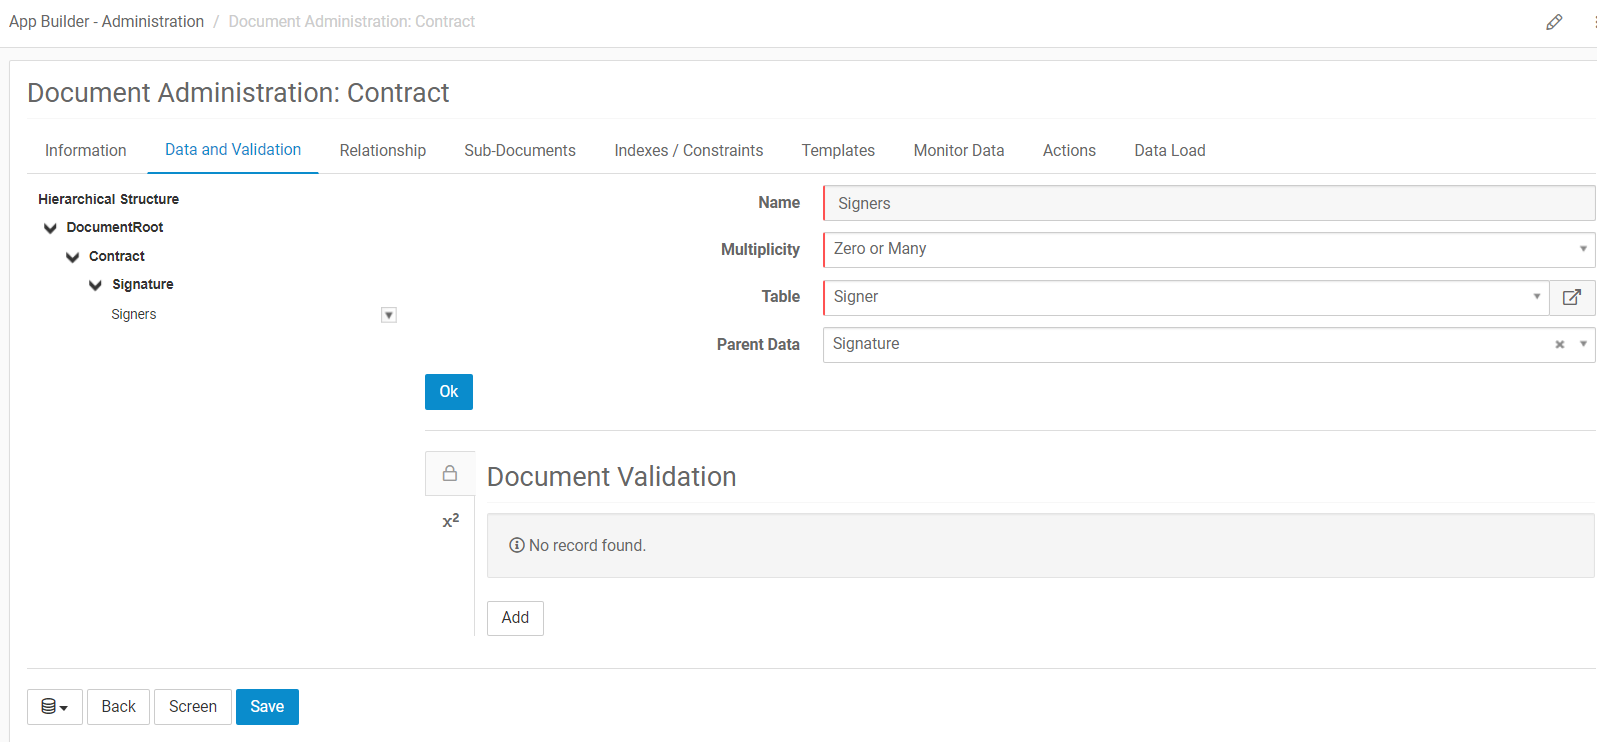
Data Structure
By design App Builder has two structures used in digital signature. The data objects Sinature and Signer.
The Signature data object can be considered the signature header. It holds information about signing/refuse dates, documents to sign, signed documents and certificates.
| Fields | Description |
|---|---|
| attachmentsToSign | List of PDF document to sign |
| signedAttachments | List os signed document and certificates |
| status | The current signature status. Possible status are: canceled, completed, declined and sent |
| sentDate | Date and time which the document were sent for signature |
| completeDate | Date and time which all the documents where signed |
| declineDate | Date and time which the signature were refused |
The Signer data object holds information about signers;
| Fields | Description |
|---|---|
| name | Signer name |
| Signer valid e-mail. Must be unique in signer list. | |
| role | Signer role |
| signerOrder | Signature order. |
| viewDate | Date and time which siner visualized the signature page. |
| refuseReason | The text containing the refuse reason. |
| action | The action performed by the signer. Possible values: complete, decline, exception, signed, sign_later. |
| actionDate | Date and time which siner visualized the signature page. |
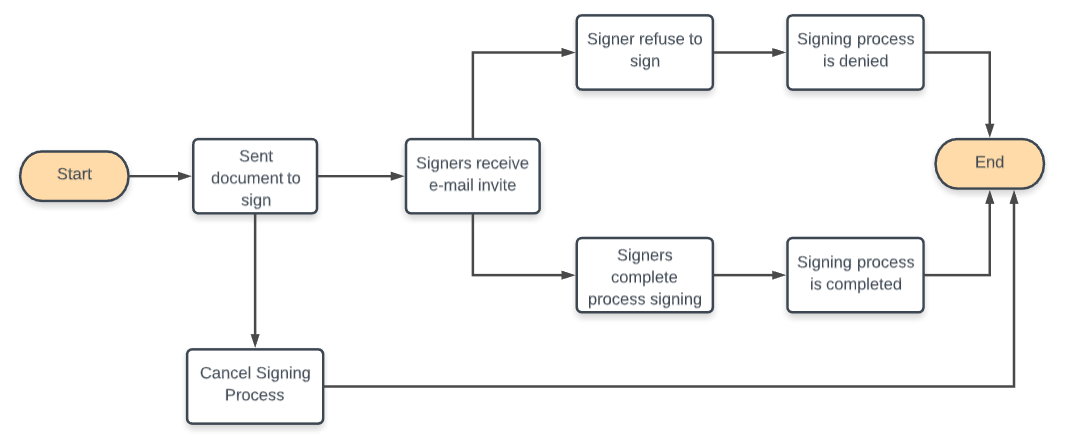
Signature Workflow
How Configure a Signature in you App
The digital signature configuration consists of the following steps:
1. Create a signer role
Create some roles in Signer Role management page.
Menu page
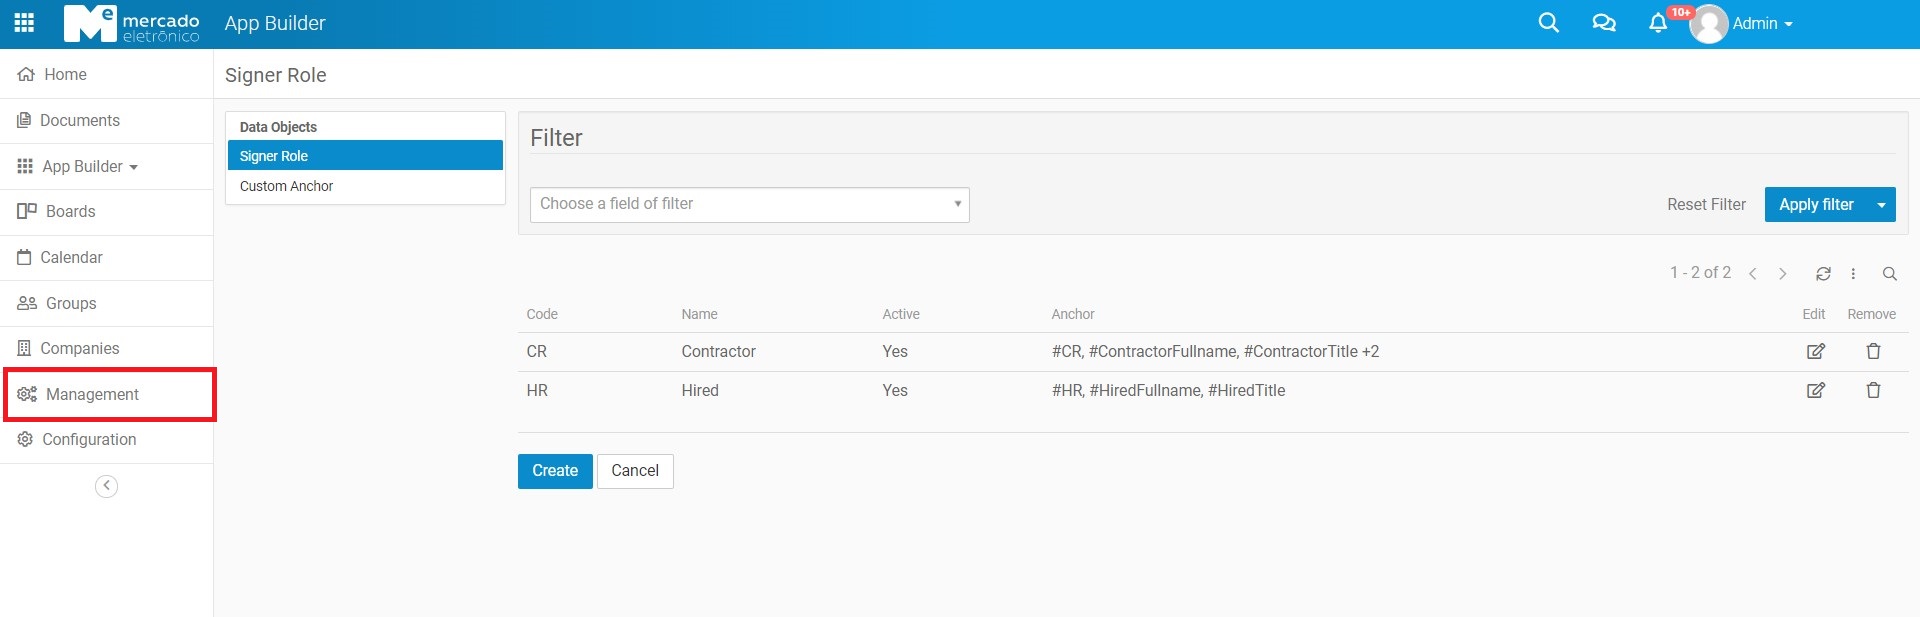
Signer Role page
1.1 Create and add some custom anchors
Optionally, you may create some custom anchors and add them to a role.
Menu page

Custom Anchor page
Adding anchors to the role
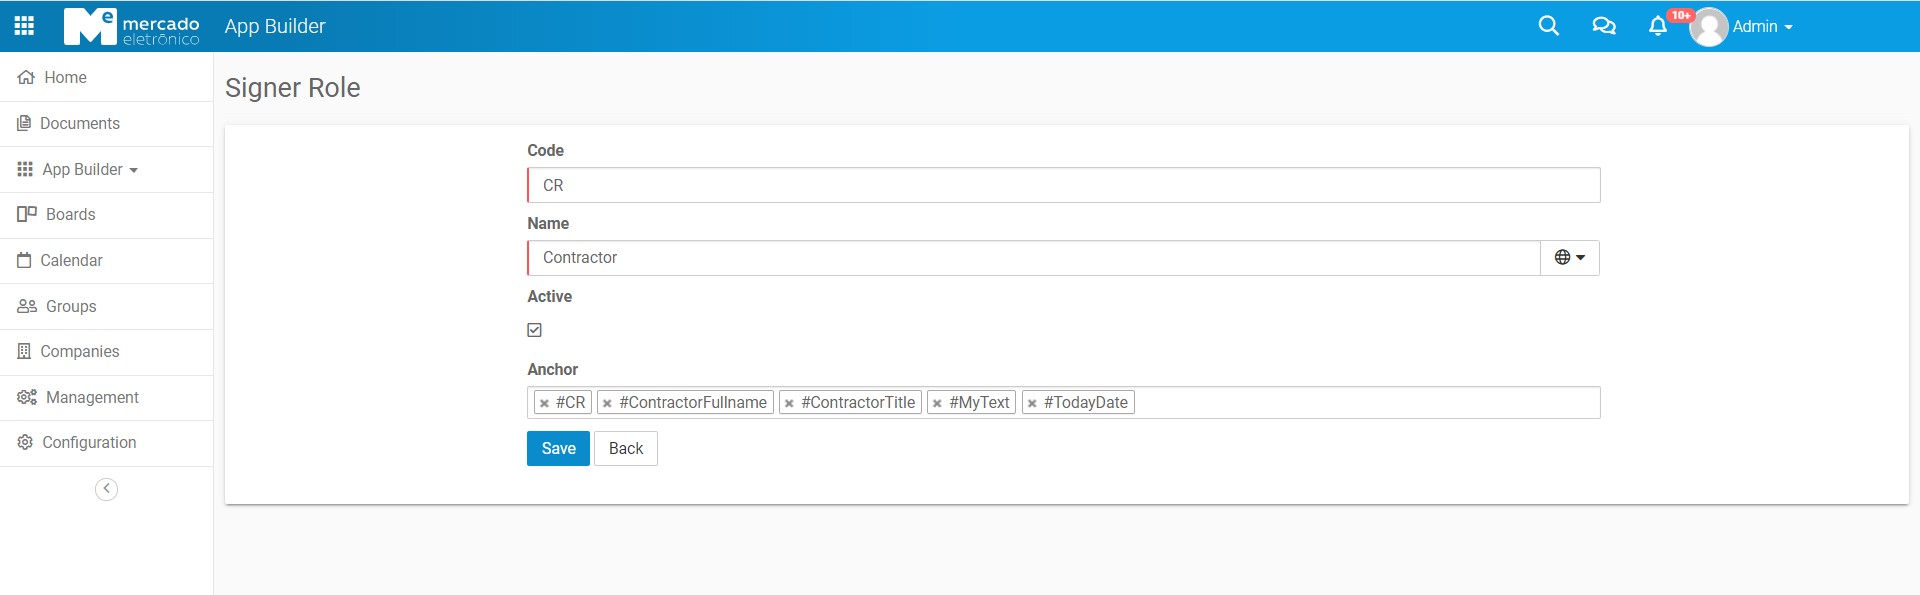
These anchors will replace the tags of the signing document by values according to the types configured:
- Signer Here: is used to position the signature location in the document;
- Date Signed: is used to include the signature date in the document;
- Text: is used to include some text in the document and can be configured as required and / or read-only;
- Full Name: is used to include the user name in the document;
- Title: is used to include a title in the document and can be configured as required and / or read-only.
2. Set up your document with Signature structure
How mentioned above is's time to add the signature data structure to you document.
Create document type data (DTD) to represent the Signature and Signer structure.
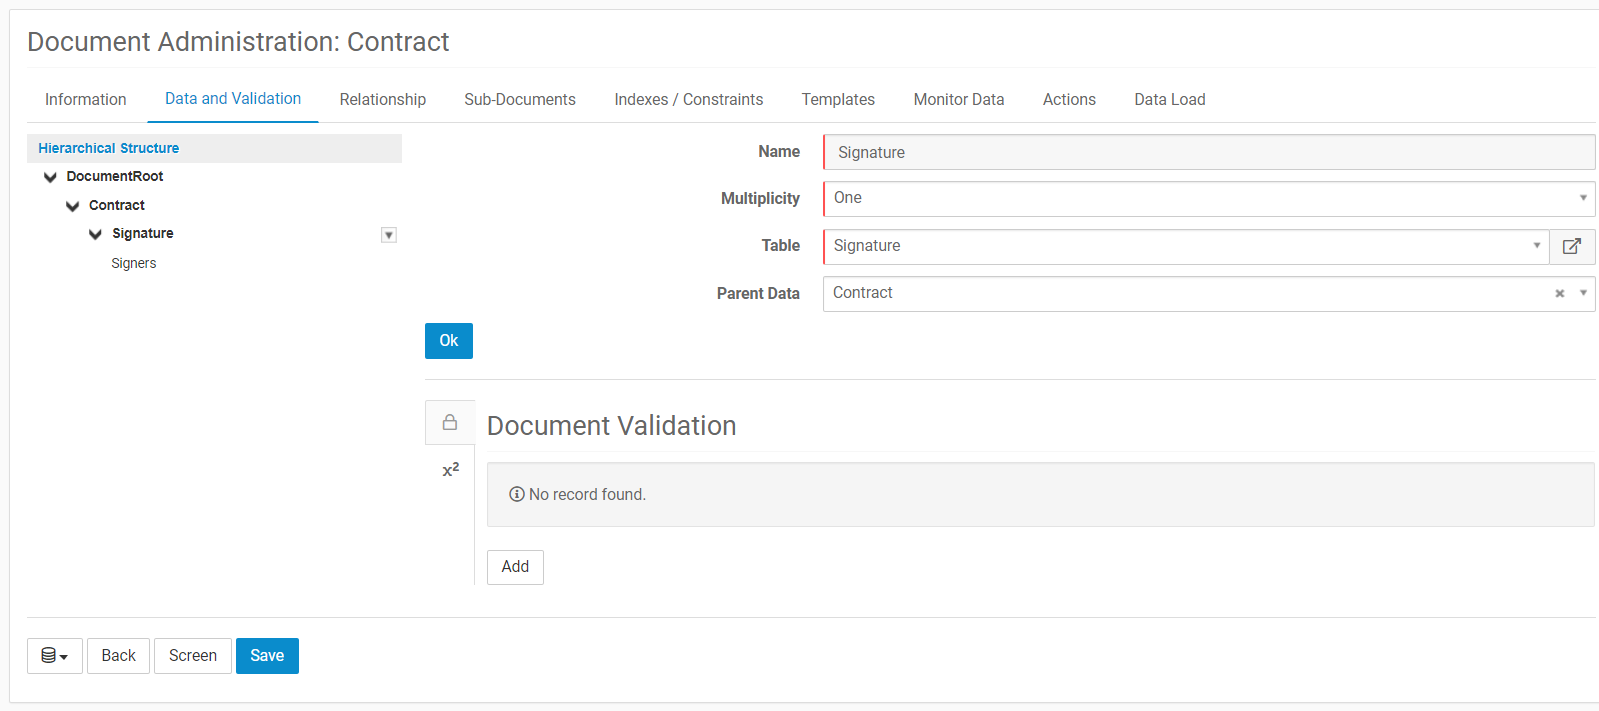
The Signature must be a DTD of type Signature and multiplicity One or Zero or One.

The Signer List must be a DTD of type Signer and multiplicity Many or Zero or Many.
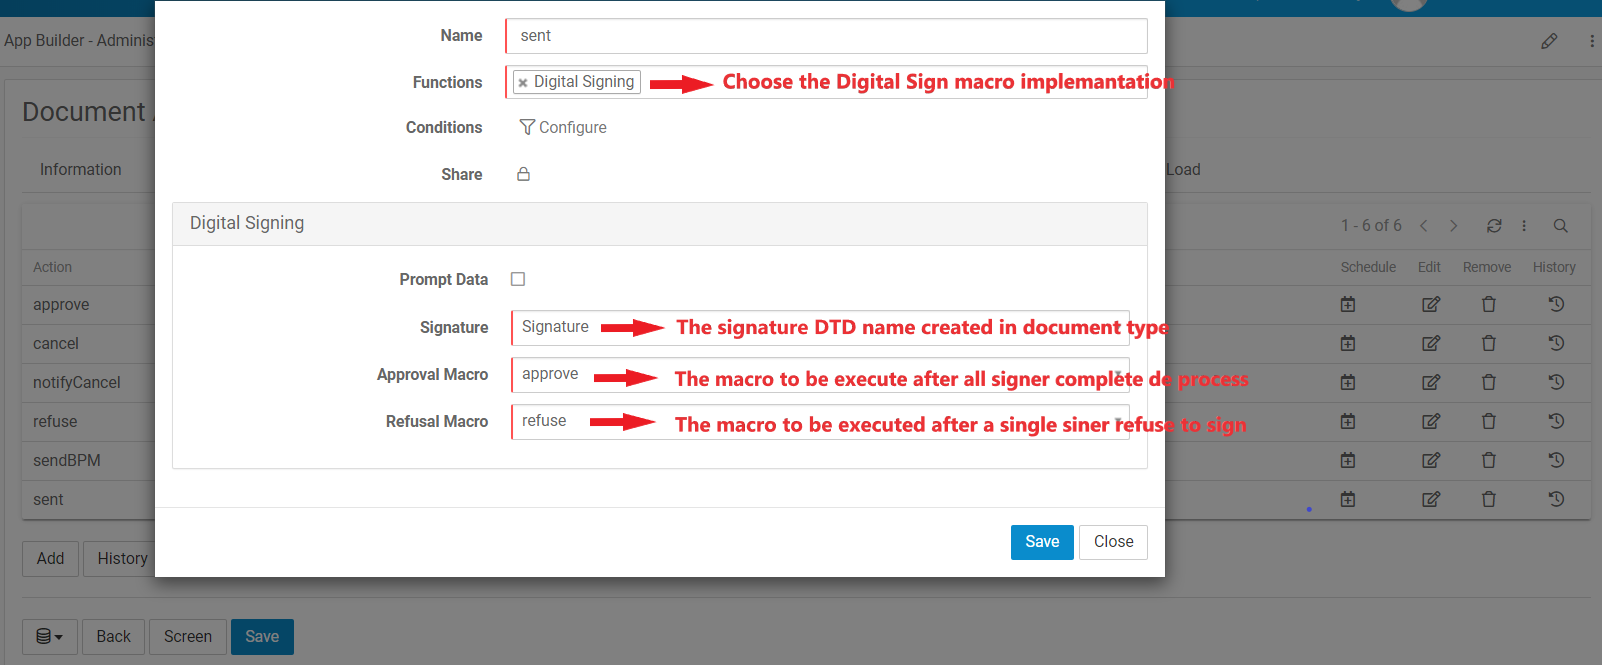
3. Create a Digital Signing macro
A brand new macro implementation was created for digital signing.
A Digital Signing starts the signing project and send the document to be signed by the signers. The signature is status will be ´Sent´.
It's means that users in the signer list will receive an e-mail invitation to sign the attached document. The invitation e-mail is based on DocumentSigning e-mail template and can be customized if necessary.
Above more information about the macro implementation.
Function - Digital Signing .
Signature - The DTD name which contains a Signature type.
Approve Macro - The macro to be executed after all signers complete the signing process. The signature status will be completed.
Refuse Macro - The macro to be executed after a signer refuse to sign. The signature status will be denied.
4. Configure your screen
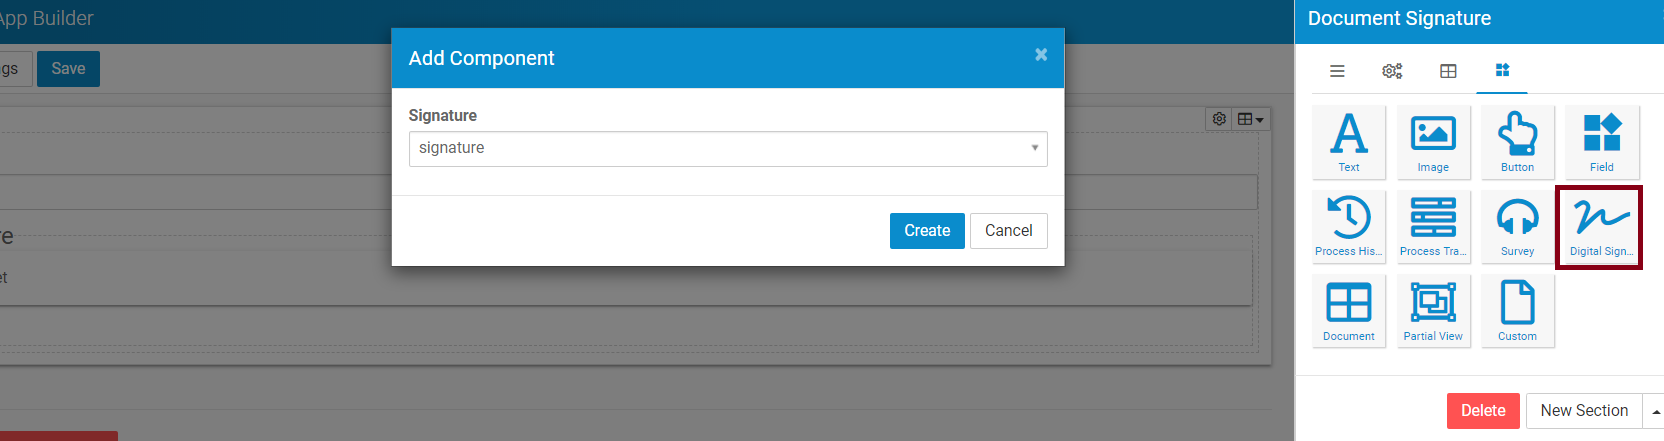
There is tow ways to configure an web interface for digital signature: using a widget or configuring a screen.
We advice beginers users to start using Digital Signature screen component.
This is easiest way to configure a web interface for digital digital signature. You just need to add the widget to your screen and inform the signature type.

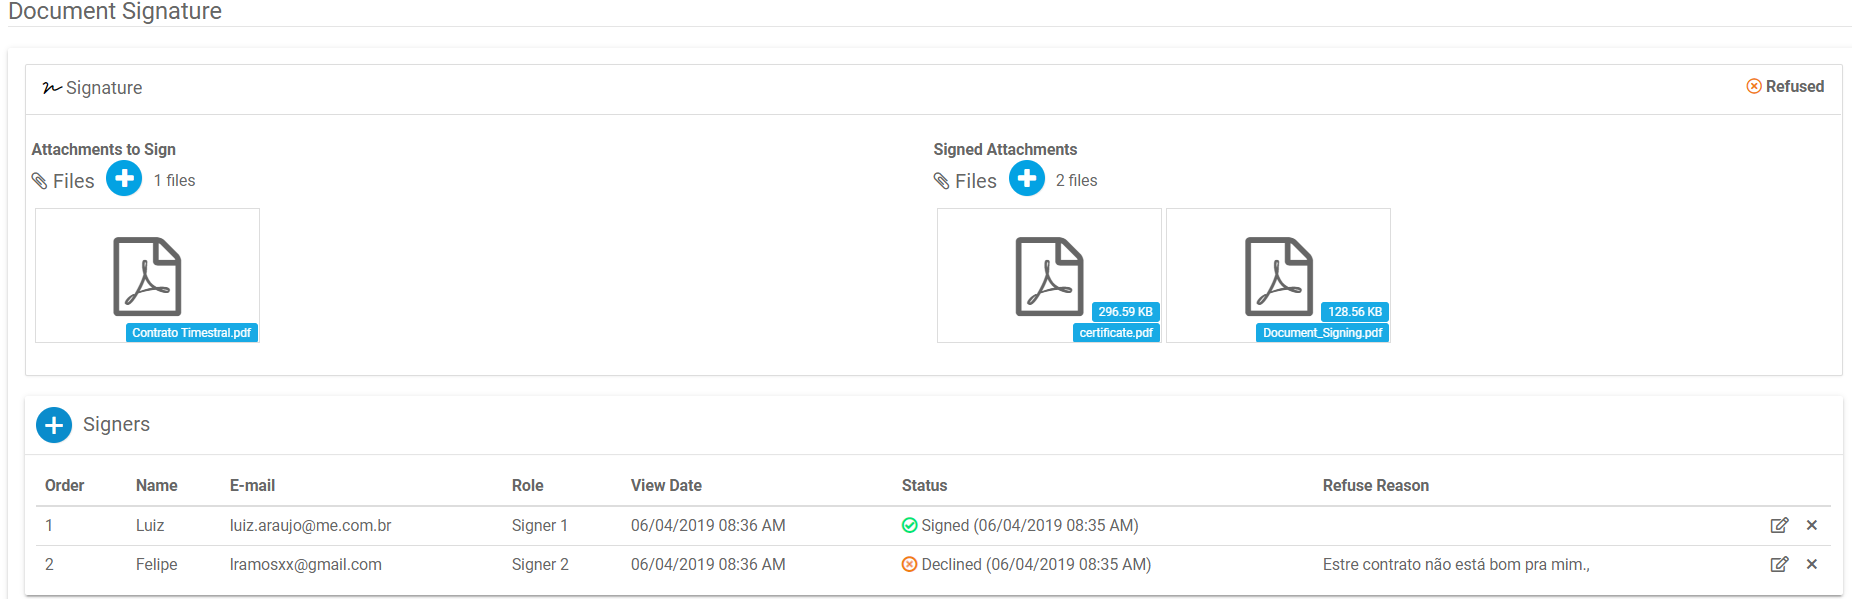
The signature widget is composed for the fallow features:
1- Signatures
Files to Sign - Files that will be sent to digital signature.
Signed Files - Signed files and it's certificates.
Signature Status - The current signature status.
2- Signers Area
Order - Signature order.
Name - Signer name.
E-mail - Signer e-mail. Must be unique in signers list.
Role - Signer Role. Used to link the signer with the signing place in the document.
View Date - The date in which the signer accessed the document for the first time.
Status - The current status.
Refuse Reason - The refuse text in case of signing refuse.
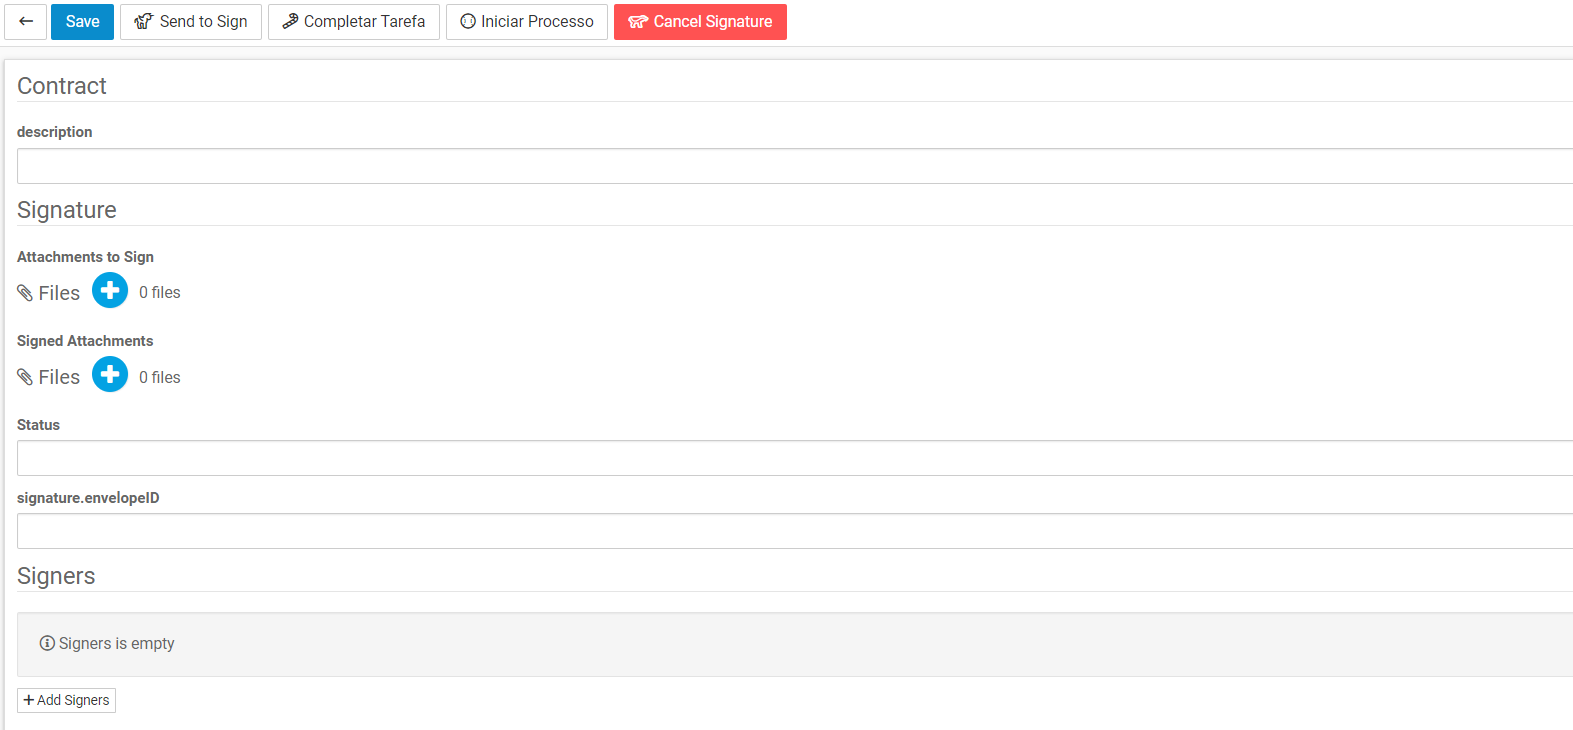
If you are a advanced user Digital Signature feature was designed to give freedom to the user build it in the screen what ever they want.
Take a look at this a layout suggestion.
5. Configure Signing Document
At this point everything should be configured and we have one last thing to do: Configure the Signing Document.
The signing document will be set to each user in singer list.
As informed above the Signer Role is used to link the signer user with the document signer. The signing document must have a tag informing the place where the signer user will sign.
This tag must match the anchor field value of some Signer Here type anchor added to the role or, if none anchor was added to the role, the tag must have the pattern: # + signerRole.code. The signer role code was defined in data object Signer Role in the field Role.
For example, Signer Role Code is CR the tag patter will be #CR.
It means that the user will sign exactly in the place that you put the tag #CR in you document.
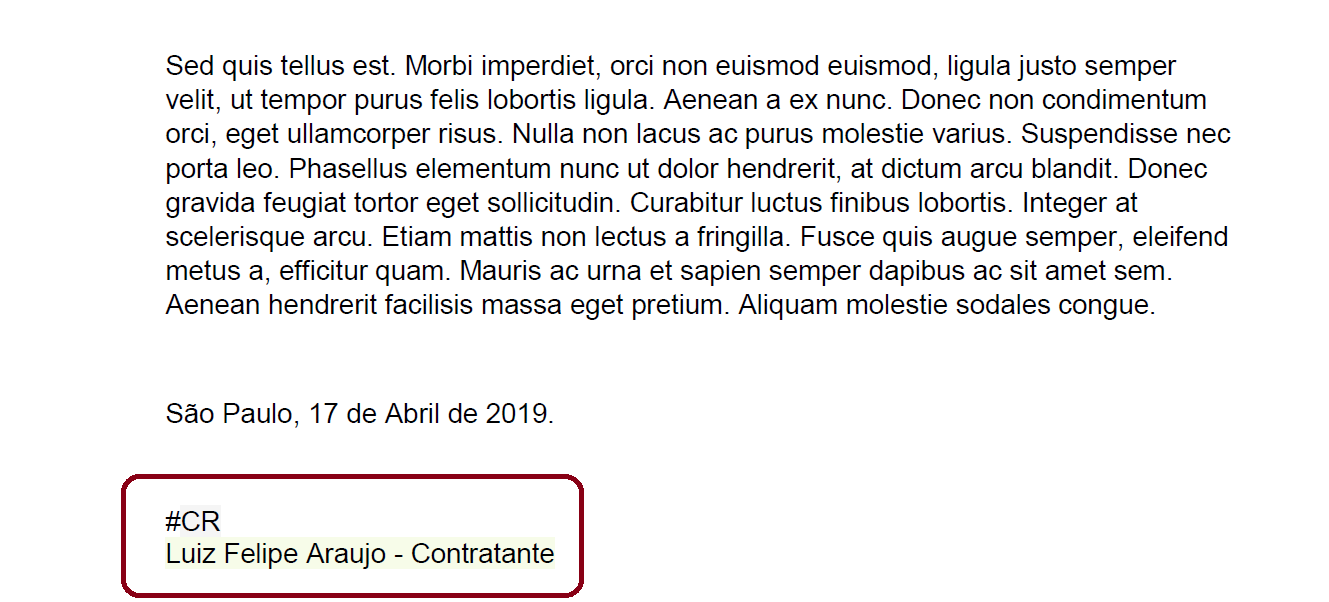
The document with the tag.
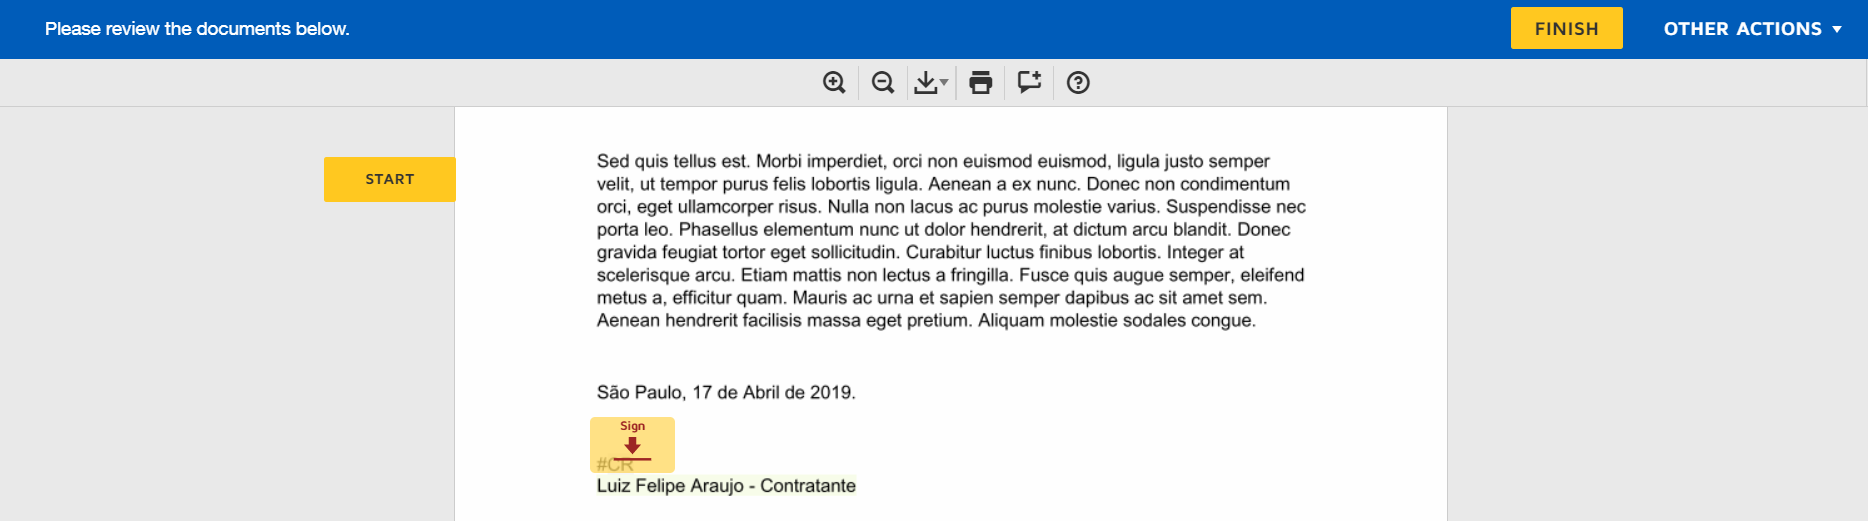
The system ask user to sign in the tag place.
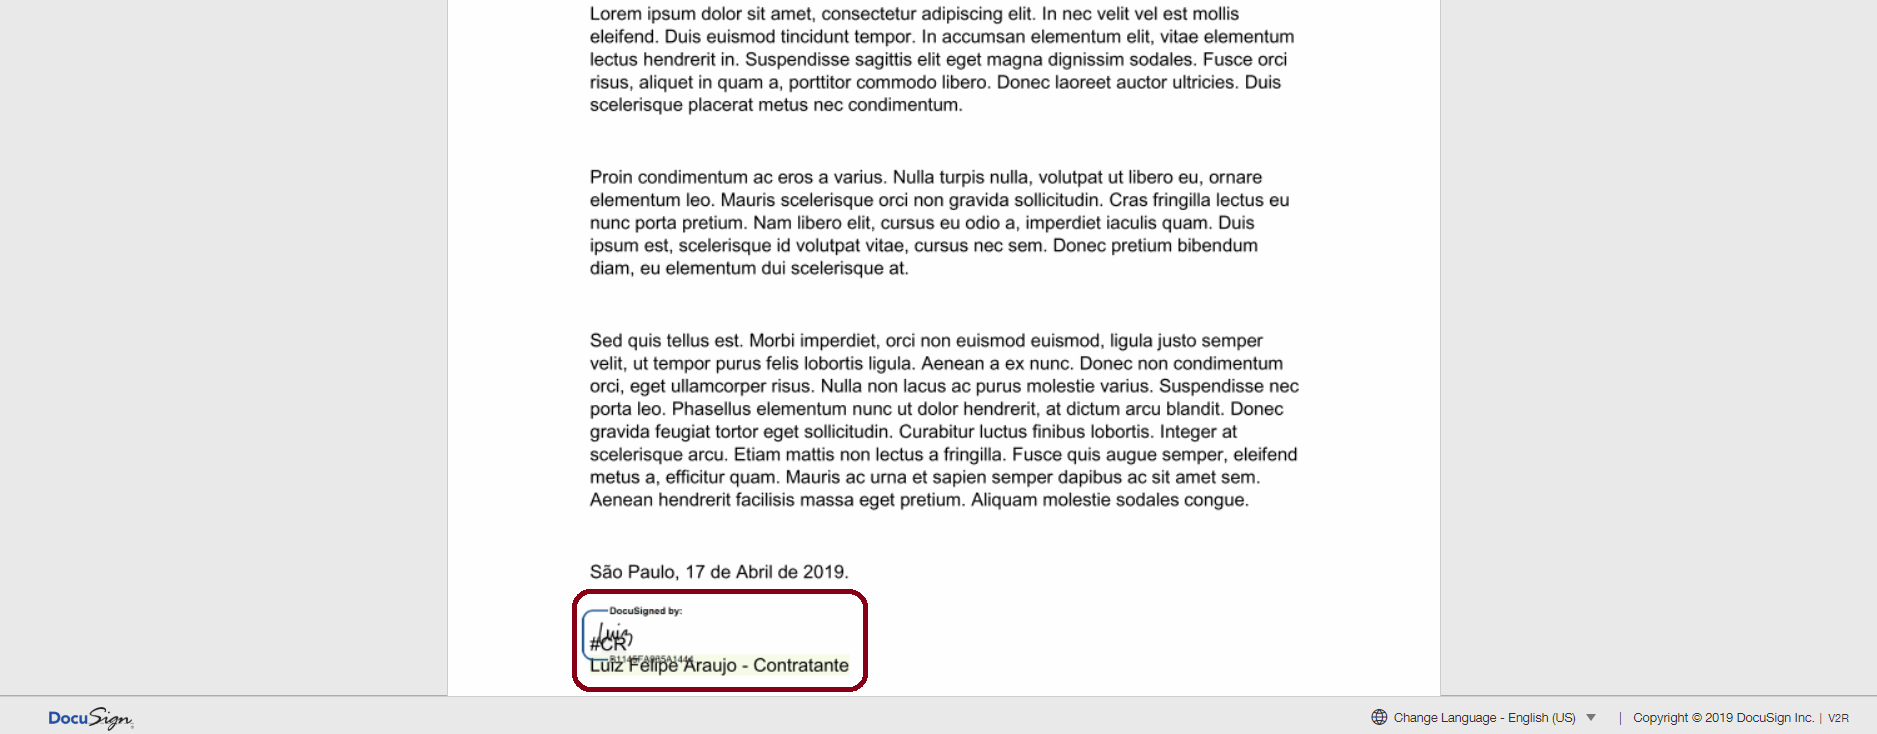
The signed document.
Signature Order
An other feature is the possibility to define the signature order. In other words, it's allow the user to define the order which each signer will sign the document.
If the some order is informed to more than one user, the user with the given order will receive the e-mail to sign the document at the same time.
Use signature order is pretty simple, you just have to add the fill the field signatureOrder. Attention, once the order is informed all the other signer must have an order.
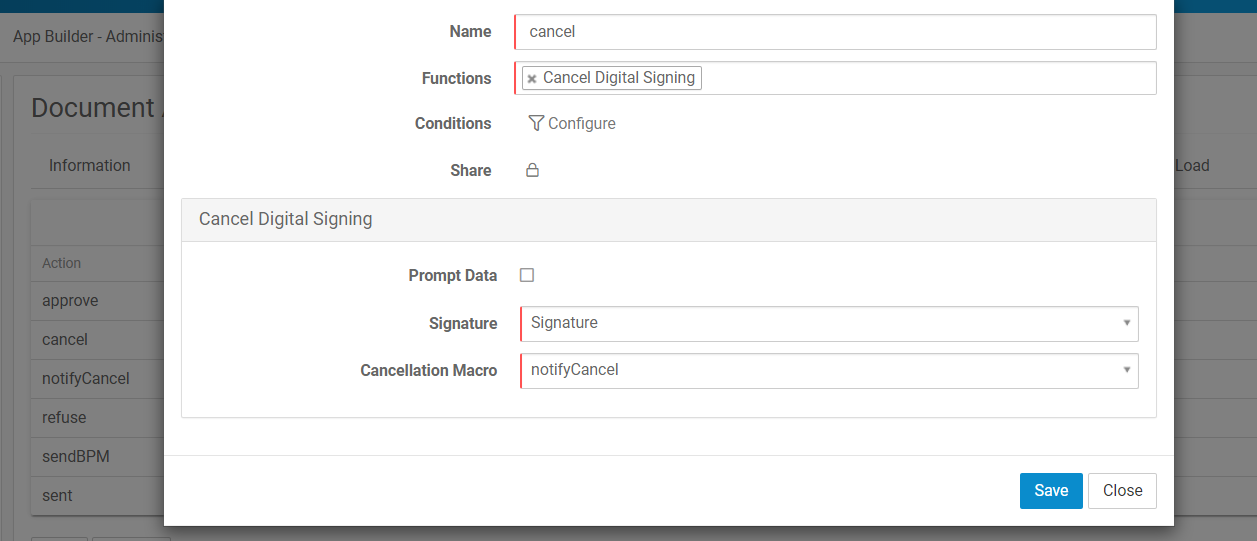
Canceling Signature
User can cancel a signature process.
To cancel a signature process use a Cancel Digital Signing macro implementation.
This macro implementation cancel the signature process and the signature status will be Canceled.
It's means that users in the signer list that haven't signed the document are not allowed to do it anymore.
All the users in the signer list will be informed by e-mail about the signing process cancellation. The cancellation e-mail is based on CancelDocumentSigning e-mail template and can be customized if necessary.
Above more information about the macro implementation.
Function - Cancel Digital Signing
Signature - The DTD name which contains a Signature type.
Cancelation Macro - The macro to be executed after the process is canceled. The signature status will be canceled.